


Whether you fancy French tips, powder dip nails or a gel finish, making time for a salon manicure appointment is an extravagance — and we don’t always have the time, resources, or patience every week to indulge in such leisure. But thanks to popularpremium-brands like Vega that offer inexpensive manicure kits, Instagram-worthy nails are literally at our fingertips.
There can be a lot that can go wrong with manicure – chipping,warping, and smudging. That’s not to say you can’t get yourself a professional-looking manicure; it just takes a little practice, and the right manicure kit.
To help you, here’s a step-by-step guide to get a salon manicure at home:
Step 1: Essential Tools
Be sure to have the following essentials of a manicure kit.
- Nail Clipper
- Nail File
- Cuticle Trimmer and Pusher
- Tweezer
- Cuticle Scissors
Step 2: Remove the Nail Paint
Use a cotton swab to remove the previous nail paint (if you have any) with a nail polish remover over the nail surface.
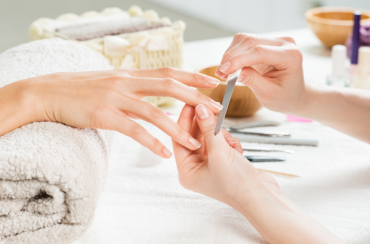
Step 3: Start with The Shape
A salon-standard manicure begins with flawlessly shaped nails. Always opt for a soft nail file from your manicure kit to avoid tearing or splitting your natural nails. It also helps your nails achieve a great shape and the best finish.
File your nails in onemotion and in onedirection, with long, light strokes. Start from the outer edge and continue in a side-to-center motion. This method creates a smooth finish and gives you more control over the nail shape.
Step 4: Soak Your Nails
Soak your hands in a container of luke-warm water (not too hot) and add a little of your gentle face cleanser or shampoo to it. Before trimming your nails, soaking the cuticles is crucialto soften the nails. Although, you must keep in mind that over-soaking may cause damage to the skin and nails, so limit this step to three minutes or less.
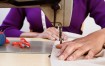
Step 5: Use Cuticle Scissors
For the cuticles, it would be a great aid to cut away the thickened skin around the nail with a cuticle scissor. Cuticle scissors are the shortest and thinnest scissors in a manicure kit.
Pro Tip:Never use a cuticle scissor from any manicure kit for anything other than cuticle care.
Step 6: Paint the Nails
• Apply a base coat to hydrate, protect and prevent nails from chipping.
• Now for the fun part—apply your favorite colour to your nails. Be sure to push the brush all the way down to the cuticle and into your nail corners. Maximum visibility on the first coat makes the second coat easy.
• Apply the second coat of nail polish after a full two minutes (set your phone timer if you know you are going to cheat). For complete, seamless coverage, sheer or pastel shades,you may need a third coat.
• Complete with topcoat. A topcoat saves the manicure from chipping and brings gloss to the nails — don’t forget it, otherwise, you’ll shorten the longevity of the paint job.
Step 7: Clean Up Any Smudges
Clean the extra nail paint with a thin layer of cottondipped in a nail polish remover toclean the outside edges of your nails.
Remember that after each use, it is essential to clean your manicure kit thoroughly at home. You can use an alcohol swab on the clippers or cuticle scissors to do this and allow them to dry completely before packing. Often, removing the nail file after a few applications is a smart idea, or when it starts losing its coarseness. When you’ve got the perfect manicure kit, and you’re using the best methods, you can certainly give yourself a gorgeous home manicure. Amongst many, brands like Vega provide all necessary tools for manicureincluding manicure kits, and single products. What’s more? The manicure kit price is surprisingly affordable and comes with a pretty bag to store everything.Go get your manicure kit and show off your perfectly manicured DIY nails!
Image Courtesy: Shutterstock


Comments